
Before I was a visual artist, I was a professional fashion photographer. So when I began my career as an artist it was always with the intention of keeping photography as one branch of whatever other art forms I might focus on.
The very first piece I ever worked on (and subsequently the only flat piece of art I ever created) was actually adapted from an abstract photograph I had taken where I overlaid the photo with a painted abstraction (see photo below)

The problem was that I was just starting out and my technique was lousy. But the concept of overpainting on a photo continued to fascinate me. A little later once I felt more comfortable with brush, I tried it once again.

This time the results were a bit better. But that was because I started working with three dimensions. You can see above that I incorporated the frame into the painting, making it part of the work. But still this was a long time ago and I knew even then that my focus had to be on three dimensional work which has continued to be a major part of much of the work I do.
But still this fascination of merging photographing and painting together has still been in the back of my mind. But one not worked on since the two shown here.
Now we move up in time 6 years to a few weeks ago and an art event that I was doing at the studio. One of my interns who is a photographer had some of his work on show. He'd given me a small canvas that the ink had smeared on and we had it out in the artists exchange area with the thought that an artist might paint over the still usable canvas and make something new out of it.
Another artist showing some of his paintings the same day asked if he could use my polyurethane to put a sealant over a piece he had with him and my intern asked if something like that could be used on a canvas reproduction to turn it from matte to gloss. So I pulled out the canvas he'd given me with the ink smear and suggested we try it out on that piece and see what we got. But I Suggested that rather than use the brush on poly, that we use the spray version instead so that the brush wouldn't smear the ink further. The small experiment was a success. The photo looked great and there was no damage to the ink and my intern decided he was going to do the same on several other pieces he had later.
A few days later I was printing a piece of digital art on my home printer and decided to experiment a bit further. If it worked on a professionally manufactured canvas, would the same spraying work on a home produced 8x11. It worked without any smudging of the ink, but the process was not satisfying. The polyurethane created a sealant but really didn't gloss up the piece any further than the already glossy photo paper had.
So I took the experiment a step further. Once the spray poly was dry, I went back to the brush poly and decided to brush on a very thick coat of it over the already sprayed photo. To my complete surprise it created a hard extremely gloss surface on the photo that looked stunning.
So again I took the experiment to the next level and recoated the photograph several times more to build up a hard gloss surface coat that created a depth to the photo. It looked deep.
So I got thinking. If this works this well, what would it do on a board backed larger piece? And what would happen if several coats were put on a larger photo and then it was overpainted and then more coats were applied over the paint? Would it in essence create more of a 3D surface to the photograph?
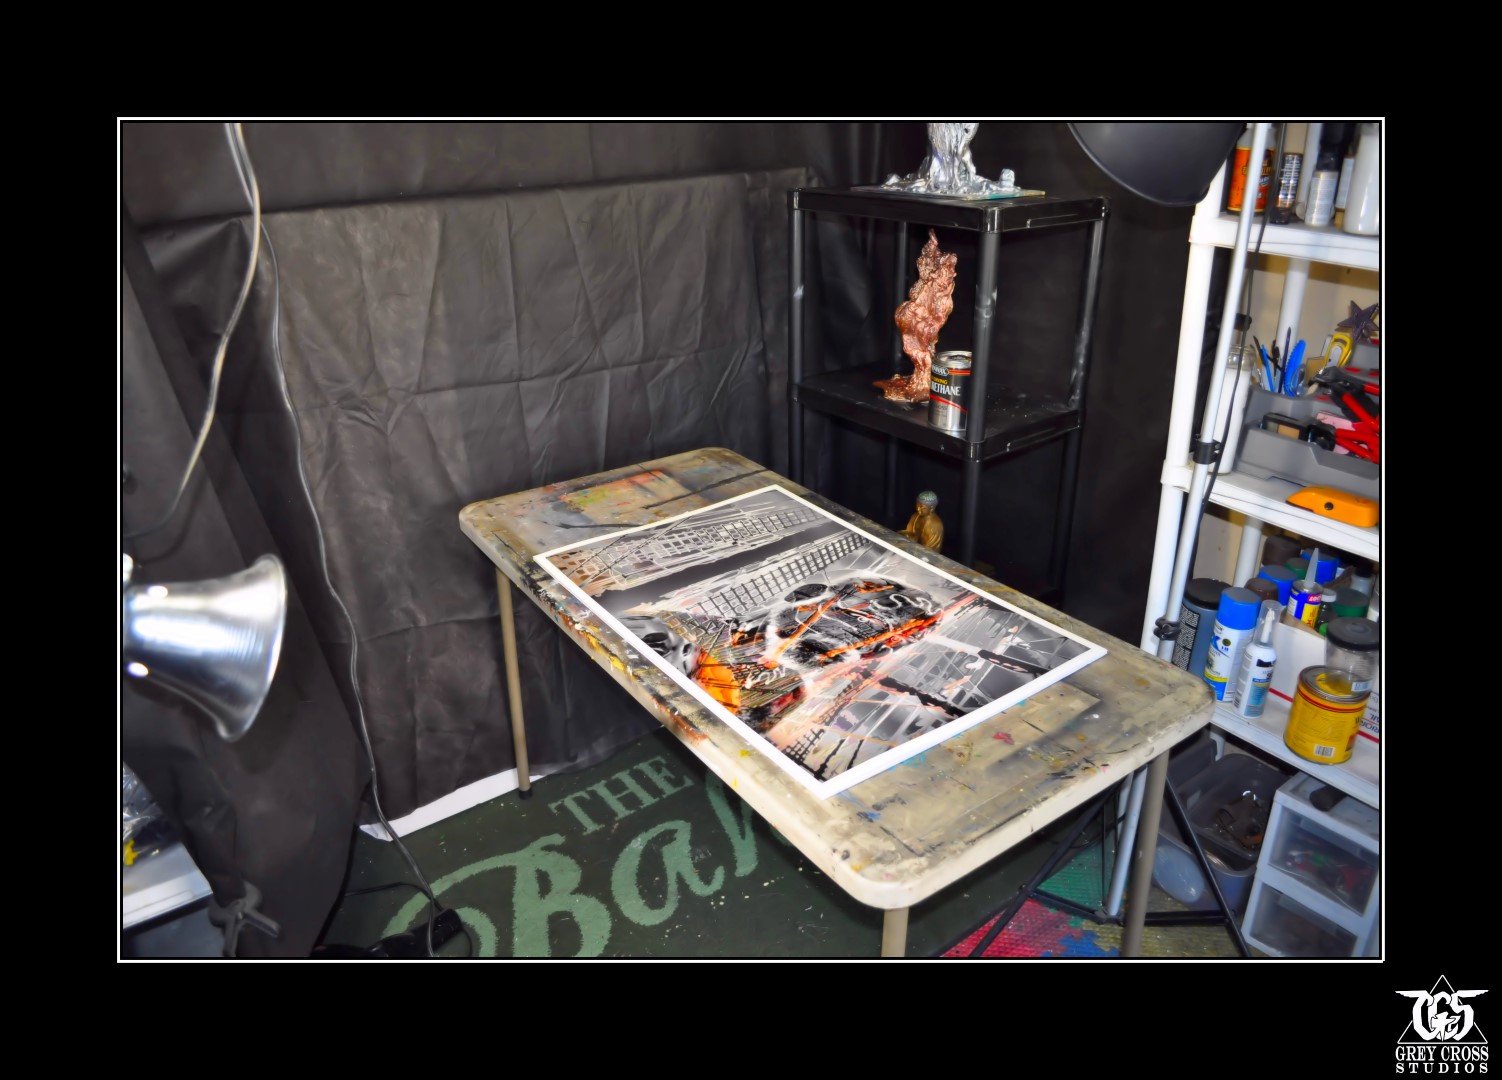
So I went out and purchased a board backed 20x30 photograph of one of my more complex digital art pieces. Now from this point on I'm going to sort of go over the steps I am taking so you can follow them and so that I have a record of those steps also.
Step #1 Overspraying with Polyurethane
So that I avoid any unpleasant ink problems I've oversprayed the photo using a Minwax fast drying gloss spray polyurethane. I've repeated this process twice and then allowed for a few hours of drying time just to be on the safe side.
Step #2 First coat brushed on Polyurethane
Using the same exact brand and type of polyurethane but in a can as opposed to a spray, I've brushed on a heavy coating across the entire surface of the photo, paying particularly close attention to the edge. I've had to use a high wattage light to scan the surface when completed for any little areas I may have missed and to spread it out so its not thicker in some areas. It was left to dry overnight. Here is a photo after the first coat.
Step #3 Foam Boarding
After drying of first coat I noticed a very slight curving of the board. It was almost unnoticeable but my feeling is that if I go to add more coats that it may increase. To compensate for this I took a piece of foam board of the same exact size as the photo and used epoxy to adhere it to the bottom of the photo. This hopefully will eliminate problems with the photo curling at all. To make the epoxy work I had to spread it out thin using a pallet knife across the whole piece of foam board before attaching the photo. I've then laid a heavy board over it to keep it from developing any kind of bubbles. Drying time will be about two hours.
You can see in this photo that adding the foam board has extended the board backed photo another quarter of an inch and has created a strong backing for it.

Step #4 Second coat Polyurethane
The second coat has now been applied to the photo. Some minor flaws in the first coat were taken care of including a long hair that had gotten sealed into it. Looking it over carefully after drying was essentially so I knew the areas to focus on and fill for the second coat. So far the only problem I've encountered is that there is some coloration issues along the border because the polyurethane has a slight yellow cast to it. This can't be seen anywhere except on the white border. I expected it though as I've encountered it in other projects. So the border will eventually be painted and then a future coat over that. Now the decision is to decide how many further coats will be added to it before I begin the first paint over phase. I'd like the polyurethane to be high enough to actually make the paints look raised also. There is no firm rule to it, so I'll just judge after each coat dries. My guess is coat #5 but we shall see.
Step #5 First Four Coats
It took four coats to get to the point I wanted the piece to be at. Now I am going to focus on painting just the border. Once that is done then a fifth coat will be applied. After each future coat a new set of detail painting will occur slowly (I hope) building up levels of paint upon it. I am also considering some minor sculpting details also, but will decide on those for sure later. Here you see it after its fourth coat moved to the easel so that I can begin the painting.

Step #6 Edge Painting
The first step in the overpainting is to paint the border first. I want the border to rest over the photo (on fourth coat of poly) but below some of the other painted details. So I've chosen now to add it. I've used a Lumiere Burnt Orange metallic for it. There are actually 3 coats applied in this photo. The first coats were to just cover the original white border completely. The last coat was to create a very subtle fire effect along the edges using a dry brush to diffuse the paint. It looks pretty dull right now but once the next coat of polyurethane is applied it should bring the metallics out nicely and will create one more layer above it.
TIP: It is easy to think about the detailing phase as nothing but paint by numbers or something akin to a coloring book. DO NOT BE DECEIVED! If you think of it this way then it will be rudimentary and there will be little room to improvise from the original design. If all your doing is enhancing a few areas that were already on the photo then why waste the time? The point is to create a truly unique piece of art from the original.

Step #7 Detail Painting Stage 1
So now we begin the detailing work. In the photo below the center rope ladder has been painted with metallic argent silver. The detailing was done by stylus, not brush. Once the next coat of polyurethane dries then I will detail the ladder with gun metal gray metallics. The objective is to build up the layers one on top of each other to give the piece depth. You'll also note that the last coat of poly over the edging is now dry and makes it stand out much better. The piece is now beginning to shift from its original to something totally new and each new layer of polyurethane is increasing the three dimensionality.
TIP: Beware hair. Make sure you brush the piece each time before adding a coating of polyurethane to keep any small hairs and fibers off the composition. Use a pair of tweezers to remove hairs. Do not try to remove by hand or else that layer of polyurethane will have a flaw.

Step #8 Detail Painting Stage 2
So here you see the piece after the first detail work was completed and the polyurethane applied yet again over it. Now comes the next level of intense detailing. First the rigging lines have been enhanced. After an underlay of argent silver I used a heavy silver raised liner paint over it to raise the rigging out. I also used a copper liner paint to raise the outer lines. Its hard to see but I've also applied a pewter metallic to some of the inner lines of the rigging also to make them look more three dimensional. Lastly I applied a metallic bronze to the central mast. Its essential now to let the raised liner paints dry for a few hours. These types of paints take longer to dry than normal acrylics do and I don't want to risk smearing anything when I apply the next coat of poly. Each level of change is small, but by the time its done it will have a major appearance change. At the end I will compare the original to the finished piece. What I find interesting is that each coating of polyurethane is building up a clear coat which is about an 8th of an inch deep now. I suspect it will be double that when completed.

TIP: If you are having a problem with bubbles in your polyurethane, use a hair dryer on the cool setting immediately after brushing on the coat. The hair dryer will pop most of the bubbles where trying to brush them out often just causes more bubbles.
Step #9 Detail Painting Stage 3
For stage 3 I brought in much more of the raised paint. I decided I really liked the way this type of paint worked with the overall concept. I use another Lumiere product for this called dimensional paints. You can see in the first image that I've added quite a bit of detail to both the rigging masts and I've now begun to bring out the tattoo marks on his face. In the second image you'll note that seen from the side that the raised paints really make a large difference to the composition. The piece now has approximately 8 coats of polyurethane on it with more to come.


Step #10 Detail Painting Stage 4
I was not happy with the scar marks on his face. The color blended too much. So I've reverted them to a raised black with the intention on the next phase of overpainting them with pearlescent white with a slight glitter in the paint. I think this will make them pop out better instead of blending with the fire lines. I've also enhanced the eyes with a brighter white to make them stand out more. I am also considering back bracing the whole piece with a strip of wood. I am noticing again a slight curve to the painting from the pull of the polyurethane. If it gets worse then I'll add the support brace next time through.

Step #11 Final Steps
So here is the final result of this procedure. It has 16 layers of polyurethane to complete it. I think I can safely say that this experiment was a success. I did not add a back brace as the curve seems to have settled and the piece again lies flat. Since it will eventually be in a frame I am not worried about a future curve to it. I've learned a great deal from this process including how crucial using the raised paints can be and how to eliminate bubbles from the polyurethane more effectively. There will be other pieces in the future using this technique and I am looking forward to adding it to my regular routine of techniques for pieces that I feel would benefit from it.
There is only one difficulty at this stage. I am not sure whether to keep its original name "The Haunting of the Slave Ship Elissa" or establish a new name for it. My instincts tell me that I should keep the name but attach an addendum to it, such as "The Haunting of the Slave Ship Elissa - The Painting". I think it would get confusing changing the name completely. This is something that I will have to consider carefully in regards to the Assimilation Art process as it can effect other things.
The final photos show the piece completed and an edge on view showing the raised aspects of the paint. I hope you found this experimental tutorial helpful. There will be others.
~Grey~


No comments:
Post a Comment