
This new piece will represent a sailing ship foundering on the rocks of a great reef, already half sunk beneath the waves. The rocks will be made with driftwood. A plate of glass will be suspended between the rocks to represent the surface of the water.
This is a great piece to observe development of because it will use several facets unusual to most sculptures. You can follow along on this page step by step as it is built.
STEP #1
Building The Straits

Using clay, foaming glue and multiple pieces of driftwood, the pieces are aligned to create a canyon where ships sail through. These forbidding rock structures for the Straits of Mephistopheles. I've used nine large pieces of driftwood selected for their sharp points to resemble sharp jagged rocks.
STEP #2
Creating Uniformity
Because the driftwood comes from a variety of sources the natural colors won't work. Black basing the wood bring it into uniformity and creates a surface that detailing can be done on later

STEP #3
Building the Ship
These are the basic components I will use to craft the sinking sailing ship. Their are 4 blocks of dry foam which have been glued together to form a single block. Dowels and pegs will form the masts and jute twine the riggings. I will use a torn white sheet for the sails.
The dry foam will be sculpted carefully into the general proportions of a complete ship without the masts. It will then be broken in half to create a jagged break and then the two pieces resculpted to create the look of a wrecked vessel.

STEP #4
Finishing the Ship
Its a very rudimentary ship right now, but all I need is to have the basic dimensions in place. I decided to add the masts for now but they are not sealed in place yet. Now the ship can be sized to the space before its split. I will also not string the masts until later.

Step #5
Slicing up the Superstructure
Because there is a glass panel placed 5 inches up to represent the surface of the ocean, its necessary to slice the ship in sections. The first section will be the prow of the ship resting above the waves. The second section is beneath the water. The third and fourth is the tale end of the ship. Once the pieces beneath the waves are measured then I'll add the rocks that will stick up around the ship. Those will be set in place but the ship will be removed again and detailed before being permanently added. Measuring is crucial right now. The foam in the corners is just supports for the glass. They will not be permanent additions.

Step #6
Cutting and Positioning Rocks
Here I've cut and positioned three of the standing rocks that are poking up through the water at low tide through the straits. Each piece had to be measured and cut at 5" first, then positioned with the superstructure of the ship to make sure there is room for everything. The next step will be to add dagger rocks beneath the surface and seal them to the tile. The tricky part is that nothing is permanently in place yet so that the undersurface can be built and detailed first. Later the glass and above ground features will be permanently added.

Step #7
Sealing the Rocks to the Tile Base
Once everything is measured out and I know the superstructure will fit snugly between the rocks then I can go ahead and seal them to the tile base using foaming glue. They will also replace the foam support bases for the glass. Now the glass can be fit into place atop them as needed.

Step #8
First Stage Detailing
The detailing work on this page is complicated. The first step is the gray under layer on the rocks. This is actually a combination of five grays blended together across the surface. When completed there will be at least 4-5 detailing stages. You can see already though that the driftwood is transforming and looking more rock like.

Step #9
Second Stage Detailing
This step included three areas. The first was a light brushing of a combination of metallic rust and brass across the upper level of the rocks. This is done partly for effect and partly to disguise any small areas of the original wood that might still be showing after they were black based. The second was a heavier brushing on of a combination of metallic ice blue and peacock pearl for all areas below the water line. The last step was a complete single coat of polyurethane over the complete piece. This will help bring out the metallics better and seal the wood a bit. More coats will be added later.

Step #10
Third Stage Detailing
The third stage begins adding snow details to the points of each rock. This uses a heavier paint to create raised snow ridges. Also note that I've put the glass plate that will be the ocean surface back in place and the rock tips to make sure everything is measuring up still.

Step #11
Fourth Stage Detailing
Now the real detail is starting to shine through. This step involved using a pearlescent paint over all the rocks above the water line. This brought the snow ridges back into sync with the rest of the sculpture and gave a nice wintery sheen to everything. Below the water line a new set of colors was introduced over the blue using aquamarine, Blue Pearl and Peridot. The colors were laid to create more of a water effect, like the sun was shining through the water. After these had been added then I gave the whole sculpture a second coat of polyurethane bringing out the metallics and pearls better and making it look much more icy.

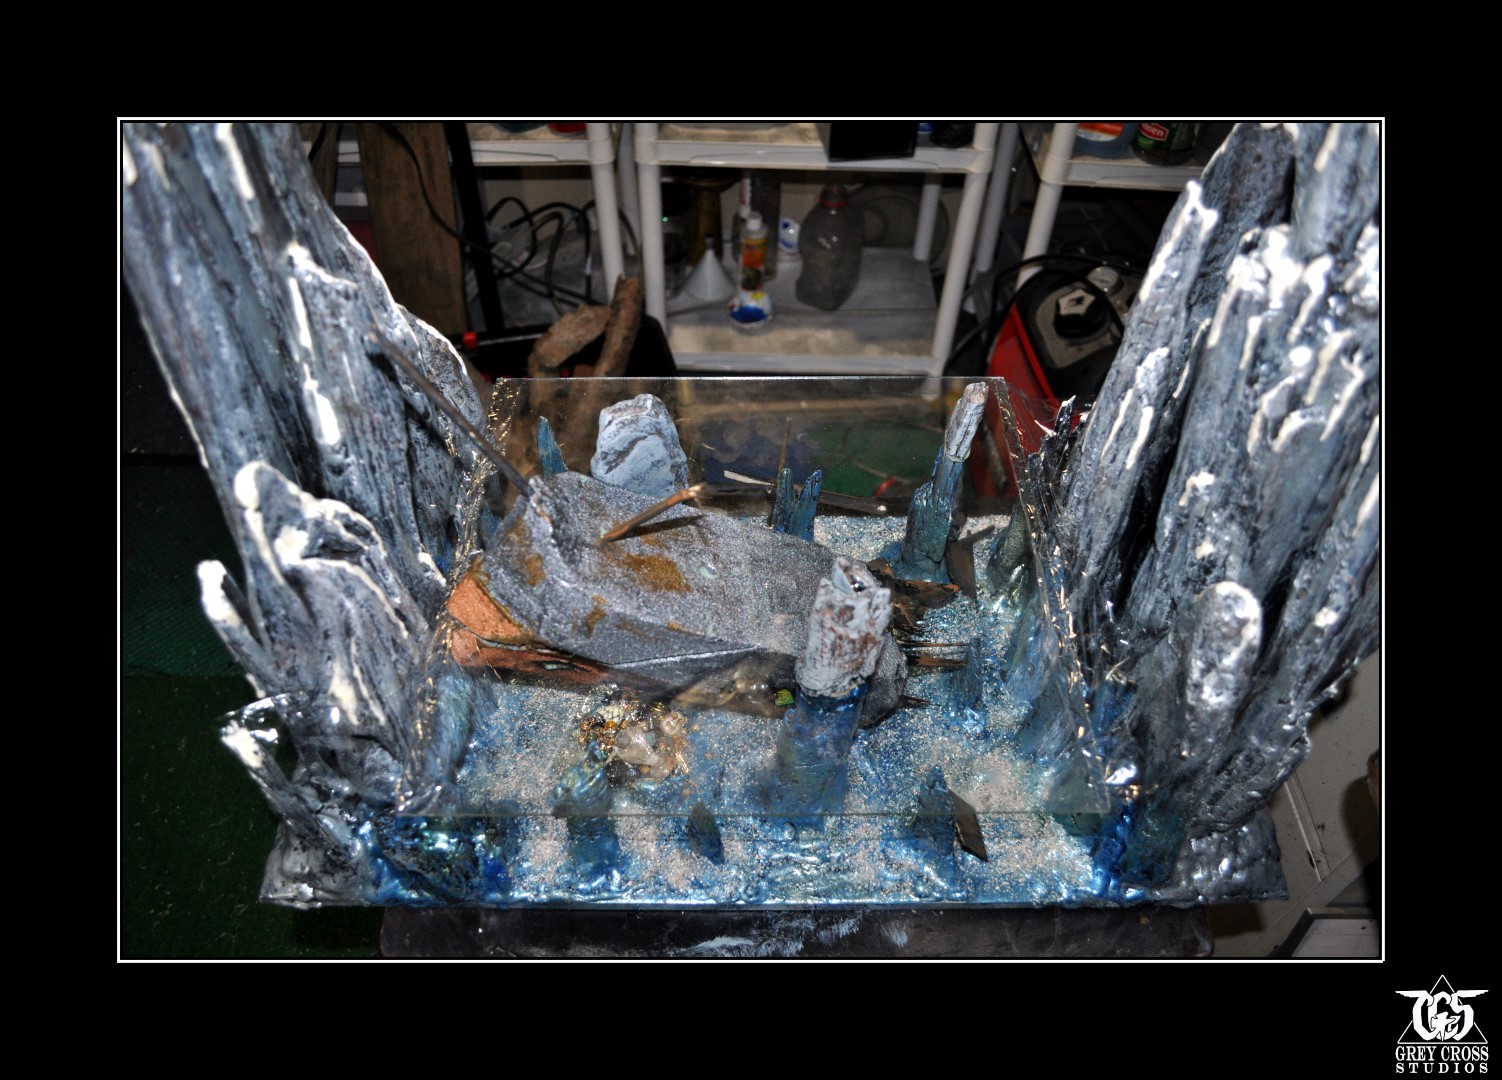
Step #12
Elements Testing
This brings all the elements so far created together to make sure everything is measured out correctly and looking in sync. If you can imagine this with tattered sales, rigging lines, crashing waves, then you can start to see the true potential of the piece. This also gives you your first view of the detail work that was started on the superstructure of the sailing ship. Lots of work yet to go there.

Step #13
Adding Plunder
Now we begin serious work on the detailing of the underwater portions of the ship. I've ripped a rather large hole in her side and painted it black so that you really get no true idea how deep the hole is. Then I began adding plundered treasure that will spill out into a pile on the seabed. This is a difficult angle in the photo but its laying on its side until everything within dries. I used a transparent GO2 Glue to embed the booty. I added two beams also to give the ship a look of multiple decks. I've also added color to the superstructure in a rust and copper and brass combination with a gunmetal gray metallic to the upper portions. She needs to look wrecked bu not ancient since the events portrayed in the sculpture are meant to have just happened.

Step #14
Maintenance Issues
A few maintenance items need to be dealt with next. First two of the rock formations that rise above the surface of the ocean are slightly lower than they need to be. To fix this I've added a clay support to even out the top of the rocks. The clay was overcoated with Go2 Glue to keep it as transparent as possible. Once dry I'll paint the areas to match the rest of the rock.
The second issue was making sure that the under portions of the ship has no gap between the glass. So I've placed the ship on the glass then inverted it and glued it to the glass. This way there is no gap when its turned back over.


Step #15
Sealing the Ocean Components
Both the rocks and the elements of the ship that are above water are now sealed to the glass. The glass is not yet sealed to the sculpture though so that the undersea portions can still be worked on and added to.

Step #16
Seabed Detailing
I've used a clear gloss mod podge to coat the seabed and the spilled treasure with. The treasure was then dumped as it its spilled out of the ship. A layer of sand was then added across the whole seabed to give it a more realistic feel. In the first photo you can see the still wet mod podge with the sand and the treasure. The second photo shows it after its dried to a clear coat. Using mod podge means that not only will it stay clear (unlike some substances that dull over time) but will seal everything in place so it wont move at all.


Step #17
Adding Debri
At this stage the focus goes back to the ship. A set of fractured and torn timbers has been added to her midsection to symbolize the breaking away of the back portion of the ship. In the first image you can see the timbers in their natural state. In the second they have been given a spotty coat of black. In the third version the ship has been put back into place on the sculpture and a raw sienna applied to the timbers to give them more of a darkened wood look. In the last image you can see all the elements put back into place. Debris has been scattered across the ocean floor. The third mast has sunk to the bottom and her front two masts have been painted in the same sienna and added above the waterline. You'll also note that a sheered off portion of the second mast has been added below the water line. The upper masts will be removed again while the waves are put into place, but all the below water elements will now remain.


Step #18
First Stage Wave Creation
This is perhaps the trickiest part of the whole sculpture. Converting the piece of glass into heaving waves. Because the glass is square its important to fill in the gaps between the glass panel and the rocks on either side. In order to do this two 6 inch long pieces of saran wrap have been glued to the edges of the glass. Once dry the glass will then be permanently added to the sculpture and the saran wrap pulled and sealed to the edges of the rocks, thus closing the gap, at least hypothetically. There are a number of things that can and might go wrong. At this stage we are about 75% complete with the sculpture.

Step #19
Second Stage Wave Creation
Here the glass has been permanently epoxied to the sculpture and the saran wrap has been edged and sealed to the side rocks in the approximate position that the waves of the sea will be placed. This is the trickiest step because its impossible to connect the saran wrap completely to the rocks. So its spot sealed in places in the hopes that when I go to lay in the waves they will complete the sealing process.
Step #20
Third Stage Wave Creation
While the saran wrap is tricky, this stage is the most difficult. Using a DAP brand clear calking, I carefully lay out strands on the glass and onto the saran wrap and using just my finger, smooth it down on either side of the strand to create wave ridges and waves crashing upon the rocks and the ship. This must be done several times with drying time in between each to build the waves to a suitable height. The calking dries pretty fast though and within an hour I should be able to move on and add to the waves heights. You can really start to get a feeling of movement now on the surface of the water.


Step #21
Stringing the Riggings
So now we really get into the detail work. Another whole phase of wave was added, building them up to a high enough level to create rough seas. Now the two above water masts have been and set in place along with more debris cast into the waves. Rigging lines using jute twine are now added and attached to the masts and strung out across the ocean surface.

Step #22
Fraying the Sails
Using a stained studio rag cut into pieces I've created a series of torn sails. Using an exacto knife to fray the edges so that it looks like they are tattered from the wind.

Step #23
Adding the Sails
After fraying the sails, the fabric is immersed for just a moment in mod podge and squeezed out after. This allow the sails in the upper riggings to look like they have movement instead of laying flat and droopy. Same of the sails extend under the ocean also. There will be one more round of riggings and sails added later.

Step #24
Painting the Waves
The silicon based calking once dry creates a great surface for paint. Here a metallic blue and a pearlescant white are applied sporadically across the waves. Care is made to leave some of the original calking showing because it looks so much like water. You can really get a sense of movement now from the piece. You can also see from this angle the way the tattered sails extend beneath the water surface.

Step #25
Freezing the World
At this stage we are now about 95% complete. An extensive icing is now being done using a thick fabric paint. Rigging lines, sails, rocks and masts are being given a final coating of ice and dripping icicle. You see it here after two icings. Several more will be done to get the icicles to drip lower. I will use a clear acrylic paint with a fine sparkle to it to coat the ice a final time and make it sparkle a bit.

COMPLETION
At this point the sculpture is complete. There are a few small tweeks I will do to it but for the most part I am satisfied with it. Here you see it photographed with its counterpart for the Nosferatu sculpture. There may be one more in this series before the March show if I am inspired to create it. A complete photo shoot will be done for this piece in the coming days and a link provided here to see close up details.
Thanks for following this tutorial. If you have any questions pose them to the blog in the space below. Please follow the next sculpture "Ascension" at the link provided as it begins its development!

No comments:
Post a Comment